Posted by Ryan Bolin - Outside Sales on 3/28/2014 - 

Wikipedia tells us that Dye Sublimation is a computer printer which employs a printing process that uses heat to transfer dye onto materials such as plastic, card, paper, or fabric.  But can your business profit from the investment? 


What Do I Need?
Before you jump in head-first, you must first consider the cost and complexity of the process. Sublimation is not just printing and applying - there are more factors that contribute to a perfect print. Here are some of the things you will need.
- Sublimation Ink Compatible Printer such as Epson and Ricoh printers.
- Sublimation Paper such as Image Right or TexPrint.
- Sublimation Ink available in cartridges, bulk bags and bottles.
- ICC Color Correction Profile to ensure that your colors come out perfect.
- Heat resistant tape if you are doing mugs, tiles, or caps, to keep your image from moving during the transfer process.
- Sublimatable Items - products that are compatible with sublimation. *note: not all mugs, tiles, t-shirts, and other imprintable items, are sublimation compatible*
- Heat press for bonding the image to the item. If you are doing mugs or caps, you need a mug or cap press, or attachments that can be bought for compatible presses.
- An ICC Profile compatible program, such as Photoshop, or CorelDraw. (Currently, the ICC Profiles cannot be managed in any other programs.)

So sublimation needs special ink, paper, and substrates with a polyester coating in order to work.

What sublimation can not do -
- Imprint cotton shirts. As mentioned before, sublimation needs polyester in order to complete the process of transfer. Sublimation will turn out best with only 100% polyester shirts. Cotton shirts should be completed with heat transfer paper.
- Imprint 65/35 and 50/50 shirts with bright colors. Since a percentage of the shirt is still cotton, the sublimation ink does not have enough polyester to create a vivid transfer. The image will end up with dull colors, especially after washing. Again, using heat transfers for cotton shirts is really the best option.
- Imprint colored shirts. Any colored background drastically alters the imprint colors. Since sublimation will become part of the shirt, any color already on the garment will overwhelm the transferred image.
- Imprint non-polymer-coated items. Remember that sublimation is printing into the coating, not the item.
- Imprint gold/silver metal used by award companies. This is another instance where the background color of the substrate will interfere with the image.

There are other factors in sublimation that will be determined by what equipment you have, such as substrate size and type, printer and paper, etc.  With the wide variety of products available to be sublimated to, you should easily be able to fill the needs of your customers with minimal investment of time and money.

Texsource Screen Printing Supply
888-344-4657

Texsource Screen Printing Supply  www.screenprintingsupply.com

Posted by Dwayne Collins - Outside Sales on 3/12/2014
One of the hardest things to do for startup shops is trying to figure our how to price their jobs - you want to try to price attractively to retain the customer, but you have all that new equipment to pay for - and of course you want a profit!  There are so many variables to figuring out the price for screen printing that this is one of the hardest things to do in our industry.

Product Brand/Style
The first major item that goes into determining the cost of screen printing is the product that is being screen printed itself.  The cost of a shirt, without any printing on it may range from as little as $2.00 to as much as $35.00. Hoodies, polo shirts, and other items can have even greater ranges.  The price for the product is also influenced by the quantity that is purchased. If you purchase 500 shirts you would pay less per shirt then if you ordered 10 shirts.  Determine your material costs and quantity for a good starting number.  

Design Locations
The more print locations you have on the shirt the greater the cost.  This is because for each location you must to setup the press with new screens and print that design as if it were a brand new project. This applies to every location you need to have printed on the same product. If you wanted a design on the left chest of a t-shirt, on the upper back, and on the lower back, that would constitute three different print locations, and would be priced appropriately. Now if the lower back and upper back design were moved closer to each other and placed in the center of the back, then the project would only be two colors, greatly reducing your printing cost.

Design Colors
This is one of the most difficult aspects for clients to understand. The basic concept is that the number of colors for each Design Location is used to determine what the screen printing charge will be. But this is not always as easy as it seems.  In many cases it can be very simplistic, in other cases not so easy.  Probably the most confusing part of this for clients is when they have the same color in two different design locations.  You as the screen printer have to know for each job how many screens are to be used and what type of inks will work best.  Depending on material, you may be able to use general purpose inks, or you may have to use polyester inks.  Other specialty inks such as neons and glitters may mean additional ink costs as well.

Graphics and Vectorization
We as screen printers require either high resolution or vector artwork. Some clients are able to provide this, but some just do not have the necessary files or graphic art skills to do so. In those cases you can assist clients with cleaning up the clients artwork or creating brand new unique artwork from scratch. The amount of time would varies with each project.  Determine an hourly rate for your time spent on this, and make the customer aware of exactly how much time you expect to spend on it and also the charges involved.

You are in business for profit (although screen printing is also fun), but starting out can sometimes be challenging especially when you may have competition in the area, but quality work and reasonable pricing will build strong word-of-mouth advertising for you and your business will grow quickly!

Texsource Screen Printing Supply
888-344-4657

Screen Restretching

Posted by Harvey Cole - Outside Sales on 2/3/2014

Screen printing is a printing style that uses a piece of fabric, called "mesh," stretched over an aluminum or wood frame. The mesh is stenciled, and then ink is rolled on and pressed to create an image on an object. This process is used for clothing, decals, product labels, signs, and displays. 
Mesh can be made from steel, nylon or polyester. When used repeatedly, it becomes slack, which affects the quality of your print. Screen Printing businesses have to decide whether to send their frames to a printing supplier to be re-stretched, or if they will do it themselves using glue and a stretching frame. This article will tell you how to re-stretch a mesh frame using adhesive.

Listed below are step by step instructions to properly restretch mesh screens.
1.    Be sure to clean your frame using a debonding solvent such as acetone to remove dirt, ink, and any remaining adhesive from your frame.

2.    Once the acetone solvent has been used, remove the used mesh from the frame. Adhesive should come off nicely as well.

3.    Using a piece of sandpaper, preferably 80 grit, sand the areas of your frame where the new mesh will be glued.

4.    Clean your frame using a tack cloth to ensure that all remaining adhesive has been removed.

5.    Next you will choose and adhesive. Depending on your mesh count, you may use a low or high viscosity adhesive. Choosing the right adhesive is crucial to be sure that your fabric (mesh) will adhere to the frame.

6.    Choose a mesh that is best suited for the type of printing you will be doing. Once you have chosen a mesh, cut the fabric slightly bigger than your frame.

7.    Place your frame on the restretching device you have chosen to use. The blocks in the middle of your screen will help to increase tension between the machine and the fabric.

8.    Place your fabric over your frame and insert it into the tension bars on your machine.

9.    While slowly increasing the tension, check the tension using a tension meter.

10. Once your tension is correct on your fabric, apply a lite coat of adhesive where the fabric attaches to the frame.
11. Make sure to allow your adhesive to dry and cure properly.
12. You can place weights on top of your frame to ensure that is doesn’t bend.
13. Once the fabric has dried, remove the tension bars and cut any excess fabric from the frame.

Things you might need:
·         Solvent (acetone)
·         Cloth
·         Tension meter
·         Adhesive
·         Frame
·         Wooden blocks
·         Sandpaper
·         Screen Stretching Machine


Texsource Screen Printing Supply
888-344-4657

Which Printer Should I Use?

Posted by Jason Cabaniss - Outside Sales on 12/4/2013
Unsure of the exact type of printer you need to get your projects completed? With so many printers on the market today, the process of deciding which printer you need and what is the most cost effective can sometimes be a very stressful task.

Whether its photo printing, sublimation printing, or just ordinary document printing, finding the right printer can make all the difference in your production and/or business.
Listed, are a few types of printers to get you started, and a brief description of what each of them offer:

1.         Epson 1430 Complete Film Output System – A slightly more expensive printer is the Epson Stylus Photo 1430 which takes photo printing to the next level. Delivering brilliant, Ultra HD prints up to 13" x 19" for extraordinary large-size prints, photos, displays and more. This high-performance printer is a wide-format photo printer that also features CD / DVD printing, so you can quickly design and print professional looking CDs / DVDs. It's never been easier to achieve vivid, large-size prints and sharp, everyday projects.

epson 1430 complete

2.         Ricoh 3110 Sublimation Printer – A fairly inexpensive sublimation printer is the easy-to-use RICOH® Aficio® SG 3110DNw GELJET™ printer which delivers high-quality color without compromising the productivity, environment, or your budget. It combines convenience and value of inkjet printing with speed, consistency, and advanced media handling capabilities of a plain paper laser printer. Its exclusive, fast-drying viscous ink technology produces compelling color documents that won’t smudge or bleed. It is sleek in design, compact in size, has a front-facing control panel, and wireless connectivity making this printer easy to use virtually anywhere.

ricoh 3110

3.         Ricoh 7700 Sublimation Printer - If you're looking for a mid-price, high speed sublimation system that's reliable and economical, the GX e7700N SubliJet-R package may be just what you need. The RICOH GX e7700N's gelsprinter technology provides long lasting, uninterrupted periods of printing. This printer has fewer clogs and less frequent refills, compared to many other standard piezo inkjet printers. The 60-68ml ink cartridges hold almost five times as much ink as comparably priced inkjet printers. Coupled with Sawgrass vivid, washfast, SubliJet-R inks, the GX e7700N is an excellent choice for the digital entrepreneur looking for a durable, yet cost effective entry into full color garment decoration.
 
ricoh 7700

It is so easy to think that the more expensive printer is always the “better” printer. However, it really depends on the job you are doing, and what is needed to complete the job. I personally feel that any of the 3 printers listed, or maybe even all of them, would be a great place to start with any project.

Texsource Screen Printing Supply
888-344-4657


Posted by Ronnie Cannon - Outside Sales on 11/20/2013


What’s the new craze over foil transfers?  The Foil Transfer process produces a metallic mirror-like effect that has become increasingly popular in the fashion industry. This effect can be applied to the entire image, or it can be applied to certain details of your image.  Foil transfers are created when a print adhesive and foil leaf are transferred. Foil is a great way to enhance your multicolor design. When using foil transfers, it is recommended to use discharge or water based inks due to the manufacturing process.
 Foil Transfers will work best with a solid base color with very little fine detail. In order to make the best of your foil transfer, it is highly recommended that the garment is washed inside-out using cold water and hang to dry.

 Application:
 1. Make sure to print your design with standard plastisol Ink. A thicker deposit of Ink is recommended as your foil will adhere better to a thicker design. 
2. The recommended curing temperature for your plastisol is 325 degrees.
3. Once garment is placed on the heart press, apply your piece of foil over the garment color side up.
4. Using heavy pressure, apply heat for about 10-15 seconds.
5. Raise the press slowly, and use a cloth to reduce heat and wrinkles.  Allow the foil to cool completely.
6. Slowly peel the foil from the garment. Be sure to cold peel the foil as “hot peeling” will cause the image to be spotty.

 How to wash and care for your garment:
 In order to make the best of your foil transfer, it is highly recommended that the garment is washed inside-out using cold water and hang to dry. Be sure not to bleach the garment, or iron on the printed area. Heat transfer foil is a very eye catching product; however, its durability is not guaranteed to outlast the garment.

Texsource Screen Printing Supply
888-344-4657


Posted by Dwayne Collins - Outside Sales on 11/7/2013


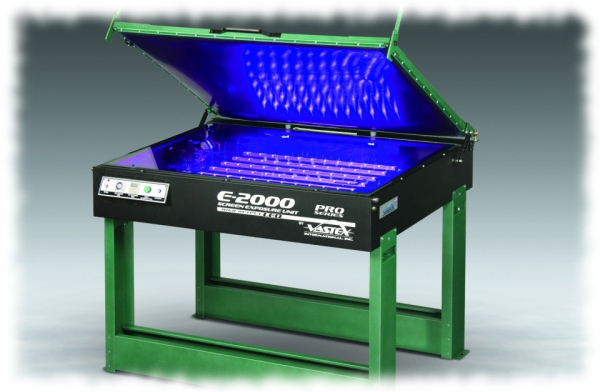
These all-new LED Screen Exposure Units from Vastex feature a long-lasting LED (light emitting diode) light pack that delivers ultra-fast exposure times while producing high resolution half-tones and crisp detail on the most intricate graphics.


The LED light pack also consumes far less electricity than metal halide lamps of equivalent surface area, and can last over 50,000 hours, significantly reducing operating and maintenance costs.
In addition, it starts instantly, provides uniform lighting intensity cycle-to-cycle, remains cool during operation, and lacks potentially dangerous high-voltage power supplies and inefficient shutters.
Both models come standard as tabletop units with a powerful vacuum hold down with rubber neoprene blanket for tight screen-to-film contact, easy-to-set fully-automatic digital controls for consistent exposures, shatter-resistant 0.25 in.- (0.63 cm-) thick tempered glass and 120-volt or 240-volt power supply.
Both can be ordered with optional, size-matched DriVault Screen Drying Cabinets (shown) to equip your shop with the very latest and most efficient screen exposing and drying system in the industry today.
FAST
Expose screens 10-15 times faster than fluorescent bulbs, and comparable to metal halide
EFFICIENT
Bulb life expectancy 50,000-100,000 hours Operates at 20% of the power required for metal halide
QUALITY
Expose very fine details and halftones
SMART
Single button operation for both vacuum and lights
ADJUSTABLE
Independent controls to adjust vacuum draw and exposure time
POWERFUL
Power vacuum hold down contours rubber neoprene rubber blanket to screen for excellent screen-to-film contact
COMPACT
Slim design saves shop space and allows mounting on drying cabinet
SAFE
No excessive heat or high voltage power supplies and shutters
DEPENDABLE
0.25 in.-(0.63 cm-) thick tempered glass, virtually eliminates breakage
SCREEN SIZE
23 x 31 in. (58.4 x 78.7 cm) or 47 x 31 in. (119.4 x 78.7 cm) max screen O.D.
GUARANTEED
3 year warranty against manufacturer's defects*
* Excludes rubber blanket.


Texsource Screen Printing Supply
888-344-4657


Posted by Steven Grant - Indiana Location Manager on 10/14/2013

The process of making a vinyl sticker begins with taking a piece of vinyl material and running it through a plotter, which cuts out the design. Once the it is cut, the next step is to remove all of the vinyl film you don't want for the sticker, a process known as "weeding." This process can be tedious, depending on the complexity of the design, but it is necessary to get a quality finished product.

Procedure

 - Place your fingernail on the edge of the vinyl sticker, between the paper backing and the vinyl sticker material so you can grip the vinyl with your hand.

 - Peel back the outside layer of vinyl from the backing, pulling the vinyl at a sharp angle to the paper, and making sure the vinyl doesn't catch on any portions of the design you need to keep. Discard the old vinyl.


 - Stick the tip of the hobby knife into the vinyl in an area that won't be visible or used later, and pull it back against the design carefully. Work from right to left if working with lettering, as most letters are open on the right side, and this will make the weeding process easier. Hold down the design using a pair of tweezers should the vinyl catch on a section that wasn't completely cut out, that way the design stays on the paper backing material.

 - Insert the tip of the hobby knife into the centers of any designs that need to be removed, such as the middle of the letter O, or the triangle in the center of the letter A. Pull out the vinyl with the hobby knife, and use the tweezers if necessary. Continue until the design is all that's left on the paper backing.

Texsource Screen Printing Supply
888-344-4657

Posted by Harvey Cole - Outside Sales on 10/1/2013

In order to avoid screen printing pitfalls, it helps to get a better understanding of the screen printing process. What is a screen print? It is basically a glorified stencil. Screen printers prepare a mesh called a “screen”. They lay this over the t-shirt and stencil on a color. They have to let the paint dry, then repeat the process for second and third colors. Screen printing isn’t just for t-shirts. It can also be for bags, badges, sweatshirts… you name it.
So what are some issues you want to avoid when you are getting t-shirts (or anything else) screen printed?

Create vector artwork If you can’t create vectors and you don’t have the budget to hire a graphic designer or illustrator, be sure you are creating artwork that can be vectorized. How do you do that? Imagine that your artwork is going to be turned into a rubber stamp. You can’t do things like gradients or textures with a rubber stamp, right? If you keep the rubber stamp in mind, your artwork should be pretty easy to vectorize.

Avoid overprint Overprint is exactly what it sounds like - a double (or even triple layer) of print. Overprint is especially bad with screen printing because the more paint you have layered onto a shirt, the more likely it is to crack down the road. Also, if you have light-colored paint printed over dark paint, the dark may show through and discolor the artwork. How do you avoid overprint? Get a graphic designer or an illustrator that knows how to build print-ready vector artwork. They will be able to create and finalize artwork without stacking shapes on top of one another. Again, if you don’t have the budget for a graphic designer, chances are, your screen printing company will have a graphics department. Some screen printers will produce shirts with overprint because it can make the process of printing easier. Don’t let them do it. Be sure that when you submit your artwork, you let them know that overprint is not okay.

Don’t print light on dark without a layer of white
The lazy screen printer is okay with printing royal blue directly on charcoal. Why is this bad? Because the dark shirt will show through, making the ink difficult to read. In order to avoid this issue, good screen printers will paint on a layer of white, then let it dry. Next, they will layer on a color. This process makes the color appear brighter and cleaner on the shirt. Be sure to let printers know that you expect two layers when you are printing light on dark, otherwise, they may not give it to you.

Break up big areas of paint A lot of people are tempted to create big, solid areas of paint for visual effect. Stay away from it. Divide shapes with small lines. Why? Because large areas of solid paint are more likely to crackle. Also, be aware that the paint used for screen printing can trap heat. If you are creating a shirt for runners, they aren’t going to want a giant slab of plastic across their back for a 10k.

More colors and prints = more screens = more money It’s important to remember that in the process, you need to be realistic. The more colors you add to your project, the more expensive your project will be. For each color, you are adding a significant amount of time on the production end. This also applies to the number of areas you are printing. For example, if you are printing a one-color job on the front, the back, the sleeve and the label area, that will mean four runs to a screen printer. Turn it into a two-color job and suddenly you have eight runs.


Texsource Screen Printing Supply

888-344-4657
Copyright © 2017 ScreenPrintingSupply.com Blog - Learn from the Very Best!